
In the first part of the article I’ve shown how UWP can be great for creating desktop applications running on Windows 10. This might not be an option for you as you still need to support Windows 7 – or you have existing WPF applications that cannot be migrated that easily to UWP. In the second part of this article series I’m adding information how WPF applications can be enhanced with features from Windows 10. This time I’m using the Desktop Bridge.

Desktop Bridge
The desktop bridge is a technology to allow using Windows Runtime APIs from WPF apps. Just be aware – there’s a reason for the picture I’ve chosen for this article. It’s a bridge, but the bridge is a little bit shaky.
The first part is extremely easy to do. You can create an APPX package and run the WPF application from this package. The sample code includes a WPF project named DesktopBridgeSample. The app package project is named DesktopBridgeSample.Package. To create such a package project, you can use the Visual Studio project template Windows Application Packaging Project. To enhance WPF, you probably wouldn’t search for this template in the category Windows Universal. However, as you enhance the WPF application with Windows Universal features, it makes sense to have this project template in this category.
After creating this project type, in the Solution Explorer you can see Applications. Clicking on Applications, you can add a reference to the WPF application.

With the Windows Application Package Project, you can configure the application like you are used to do with Universal Windows apps. With the project properties, you need to configure the minimum and target version of Windows. The desktop bridge was introduced with Windows 10 build 1607, but you can use it with apps targeting the older Windows Anniversary Update, build 14393.

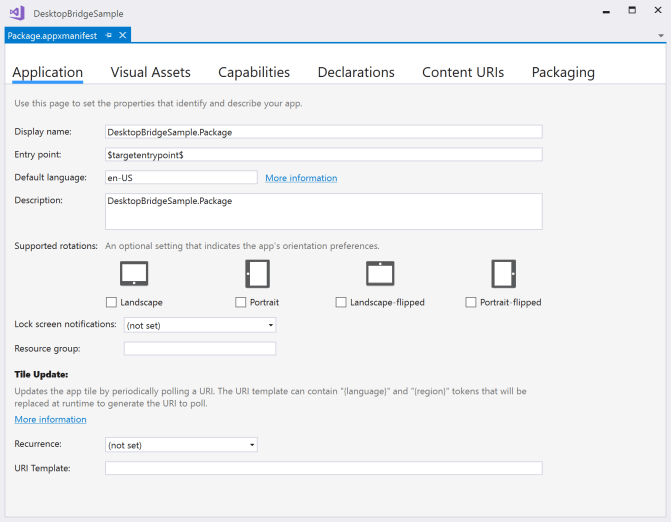
Opening the Package.appxmanifest editor, you can configure the application, visual assets, capabilities of the app, and more Windows 10 specific configurations. Using the application settings you can configure an URL from an back-end server that returns XML tile information to update the application tile on a specified recurrence between 30 minutes and one day. Visual assets allow to configure default images for the tiles in various resolutions. Capabilities allow to configure features that the app should be allowed to use – such as accessing location information, or access to the pictures library. The user still has to agree to these capabilities. Declarations allow you to specify the contracts the application implements. For example, you can share data with other Universal apps.
With this project in place, you can start the WPF application directly, or by starting the package project. Starting the application with the package project, the application needs to be deployed before it is started. In the Output window you can see the deployment in action – if the Configuration Manager is configured to deploy the application automatically.

Using Windows Application Packing Projects to package a WPF application, the WPF application becomes a packaged app.
Using Windows Runtime APIs
Using Windows Runtime APIs, references to the metadata files for the Windows Runtime need to be added to the WPF project. Currently, in the Reference Manager, the Browse… button needs to be used to reference these files. The table lists the files and their location where you can find the files.
Be aware adding references using Browse… adds the files using relative locations. As these files are typically outside of your project, the relative location no longer works when you move the project to a different directory. Probably you want to change the directories to absolute directories. Here, the files still need to exist in the referenced location on your development system.
This file contains hidden or bidirectional Unicode text that may be interpreted or compiled differently than what appears below. To review, open the file in an editor that reveals hidden Unicode characters.
Learn more about bidirectional Unicode characters
| <ItemGroup> | |
| <!– … –> | |
| <Reference Include="System.Runtime.InteropServices.WindowsRuntime" /> | |
| <Reference Include="System.Runtime.WindowsRuntime, Version=4.0.0.0, Culture=neutral, PublicKeyToken=b77a5c561934e089, processorArchitecture=MSIL"> | |
| <SpecificVersion>False</SpecificVersion> | |
| <HintPath>C:\Program Files (x86)\Reference Assemblies\Microsoft\Framework\.NETCore\v4.5\System.Runtime.WindowsRuntime.dll</HintPath> | |
| </Reference> | |
| <Reference Include="System.Runtime.WindowsRuntime.UI.Xaml, Version=4.0.0.0, Culture=neutral, PublicKeyToken=b77a5c561934e089, processorArchitecture=MSIL"> | |
| <SpecificVersion>False</SpecificVersion> | |
| <HintPath>C:\Program Files (x86)\Reference Assemblies\Microsoft\Framework\.NETCore\v4.5\System.Runtime.WindowsRuntime.UI.Xaml.dll</HintPath> | |
| </Reference> | |
| <!– … –> | |
| <Reference Include="Windows"> | |
| <HintPath>C:\Program Files (x86)\Windows Kits\10\UnionMetadata\Facade\Windows.WinMD</HintPath> | |
| </Reference> | |
| <Reference Include="Windows.Foundation.FoundationContract"> | |
| <HintPath>C:\Program Files (x86)\Windows Kits\10\References\10.0.16299.0\Windows.Foundation.FoundationContract\3.0.0.0\Windows.Foundation.FoundationContract.winmd</HintPath> | |
| </Reference> | |
| <Reference Include="Windows.Foundation.UniversalApiContract"> | |
| <HintPath>C:\Program Files (x86)\Windows Kits\10\References\10.0.16299.0\Windows.Foundation.UniversalApiContract\5.0.0.0\Windows.Foundation.UniversalApiContract.winmd</HintPath> | |
| </Reference> | |
| <Reference Include="WindowsBase" /> | |
| <Reference Include="PresentationCore" /> | |
| <Reference Include="PresentationFramework" /> | |
| </ItemGroup> |
Some of the Windows Runtime APIs require the application to run from a package. To see information about the package I’ve created the PackageNameService class which uses the Package API from the Windows.ApplicationModel namespace. The method GetPackageName returns the display name and full name of the package. In case the application is not running within a package, when accessing the Current property of the Package, the InvalidOperationException is thrown. Catching this exception, "no package" is returned.
This file contains hidden or bidirectional Unicode text that may be interpreted or compiled differently than what appears below. To review, open the file in an editor that reveals hidden Unicode characters.
Learn more about bidirectional Unicode characters
| using BooksLib.Services; | |
| using System; | |
| using Windows.ApplicationModel; | |
| namespace DesktopBridgeSample.Services | |
| { | |
| public class PackageNameService : IPackageNameService | |
| { | |
| public (string name, string id) GetPackageName() | |
| { | |
| try | |
| { | |
| Package package = Package.Current; | |
| return (package.DisplayName, package.Id.FullName); | |
| } | |
| catch (InvalidOperationException) | |
| { | |
| return ("no package", ""); | |
| } | |
| } | |
| } | |
| } |
The APIs currently available for packaged apps are listed in UWP APIs available to a packaged desktop app (Desktop Bridge).
Updating Tiles
One API that can only be used from packaged apps is updating of the tile. Using the BadgeUpdateManager, the sample code updates the badge number of the tile every time the UpdateTile method is invoked:
This file contains hidden or bidirectional Unicode text that may be interpreted or compiled differently than what appears below. To review, open the file in an editor that reveals hidden Unicode characters.
Learn more about bidirectional Unicode characters
| using BooksLib.Services; | |
| using System; | |
| using System.Threading; | |
| using System.Windows; | |
| using Windows.Data.Xml.Dom; | |
| using Windows.UI.Notifications; | |
| namespace DesktopBridgeSample.Services | |
| { | |
| public class UpdateTileService : IUpdateTileService | |
| { | |
| private static int s_badgeNumber = 0; | |
| public static int GetBadgeNumber() => | |
| Interlocked.Increment(ref s_badgeNumber); | |
| public void UpdateTile() | |
| { | |
| try | |
| { | |
| XmlDocument badgeXml = BadgeUpdateManager.GetTemplateContent(BadgeTemplateType.BadgeNumber); | |
| XmlNodeList badge = badgeXml.GetElementsByTagName("badge"); | |
| badge[0].Attributes[0].NodeValue = GetBadgeNumber().ToString(); | |
| var notification = new BadgeNotification(badgeXml); | |
| BadgeUpdateManager.CreateBadgeUpdaterForApplication().Update(notification); | |
| } | |
| catch (Exception ex) when (ex.HResult == -2147023728) | |
| { | |
| MessageBox.Show("not started with a package?"); | |
| } | |
| } | |
| } | |
| } |

Starting UWP Apps from WPF
Packaged apps can’t use all APIs of the Windows Runtime. Indeed, many APIs are still missing. For example, you can’t use Windows APIs in need of a window. However, you can create a UWP application where you can use all the Windows Runtime features, and communicate with this application from WPF.
To allow starting the UWP application from WPF, you can add a declaration to the UWP application to start it via a protocol. With the sample application, the UWP app is started via the sampleapp protocol.
Within the overridden OnActivated method in the App class, the UWP application checks if it was activated via protocol, and passes such information to the main page:
This file contains hidden or bidirectional Unicode text that may be interpreted or compiled differently than what appears below. To review, open the file in an editor that reveals hidden Unicode characters.
Learn more about bidirectional Unicode characters
| protected override void OnActivated(IActivatedEventArgs args) | |
| { | |
| base.OnActivated(args); | |
| if (args.Kind == ActivationKind.Protocol) | |
| { | |
| Frame rootFrame = Window.Current.Content as Frame; | |
| if (rootFrame == null) | |
| { | |
| rootFrame = new Frame(); | |
| Window.Current.Content = rootFrame; | |
| rootFrame.Navigate(typeof(MainPage), "protocol activated"); | |
| } | |
| Window.Current.Activate(); | |
| } | |
| } |
From the WPF application, the Launcher class from the Windows.System namespace is used to launch the UWP application via the protocol. This API is available for packaged apps.
This file contains hidden or bidirectional Unicode text that may be interpreted or compiled differently than what appears below. To review, open the file in an editor that reveals hidden Unicode characters.
Learn more about bidirectional Unicode characters
| using BooksLib.Services; | |
| using System; | |
| using System.Threading.Tasks; | |
| using Windows.System; | |
| namespace DesktopBridgeSample.Services | |
| { | |
| public class LaunchProtocolService : ILaunchProtocolService | |
| { | |
| public async Task LaunchAppAsync(string protocol) | |
| { | |
| await Launcher.LaunchUriAsync(new Uri($"{protocol}://")); | |
| } | |
| } | |
| } |
Communication via App Services
Using the UWP app, you can use all the features from the Windows Runtime, and all the new controls with e.g. ink and map functionality. You just might need to communicate information from the UWP app with the WPF application. To communicate between UWP and WPF, App Services can be used. This API is available for packaged apps as well.
App Services previously have been only available creating Windows Runtime Components. Now they can be implemented in the UWP app which makes the communication between UWP and WPF easier.
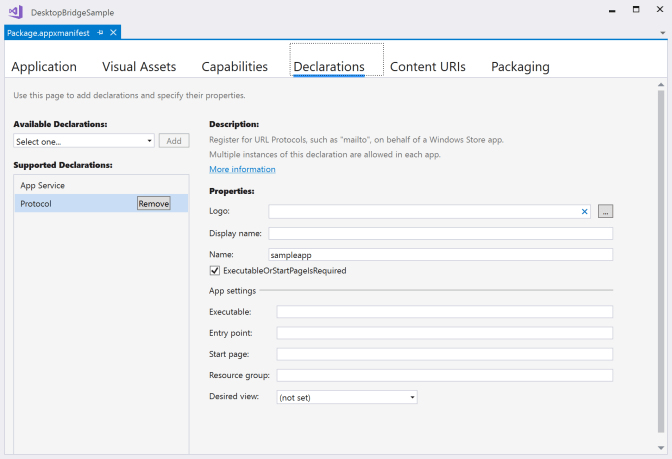
Creating an App Service, Windows needs to know about it to allow starting the component. This is done selecting Declarations in the Package Manifest Editor, adding an App Service. The name needs to be unique on the system. For unique names it’s useful to include your own domain, such as com.cninnovation.desktopbridge. Using the in-app mode it’s not necessary to define an entry point – contrary to when the app service is implemented with a Windows Runtime Component.

When the app service is instantiated, within the OnBackgroundActivated method in the App class gets invoked. When a message is received, the RequestReceived event is fired. Data can be transferred passing information in a ValueSet. The handler method OnAppRequestReceived deals with messages from the WPF application and messages from the UWP application. If a message from the WPF application contains the command key with the value StartEvents, the app service connection is remembered to forward events coming from the UWP application across this connection. If the sender is different from the WPF application (the UWP application), the ValueSet received is sent to WPF using the method SendMessageAsync on the app service connection to the WPF application.
This file contains hidden or bidirectional Unicode text that may be interpreted or compiled differently than what appears below. To review, open the file in an editor that reveals hidden Unicode characters.
Learn more about bidirectional Unicode characters
| private AppServiceConnection _appServiceConnection; | |
| private BackgroundTaskDeferral _appServiceDeferral; | |
| protected override void OnBackgroundActivated(BackgroundActivatedEventArgs args) | |
| { | |
| base.OnBackgroundActivated(args); | |
| IBackgroundTaskInstance taskInstance = args.TaskInstance; | |
| if (taskInstance.TriggerDetails is AppServiceTriggerDetails appService) | |
| { | |
| _appServiceDeferral = taskInstance.GetDeferral(); | |
| taskInstance.Canceled += OnAppServicesCanceled; | |
| _appServiceConnection = appService.AppServiceConnection; | |
| _appServiceConnection.RequestReceived += OnAppServiceRequestReceived; | |
| _appServiceConnection.ServiceClosed += AppServiceConnection_ServiceClosed; | |
| } | |
| } | |
| private AppServiceConnection _wpfConnection; | |
| private async void OnAppServiceRequestReceived(AppServiceConnection sender, AppServiceRequestReceivedEventArgs args) | |
| { | |
| var deferral = args.GetDeferral(); | |
| ValueSet message = args.Request.Message; | |
| if (_wpfConnection == null) | |
| { | |
| if (message.TryGetValue("command", out object val) && val.ToString() == "StartEvents") | |
| { | |
| _wpfConnection = sender; | |
| var response = new ValueSet | |
| { | |
| { "result", "OK" } | |
| }; | |
| await args.Request.SendResponseAsync(response); | |
| } | |
| // else nothing to do, WPF app not yet connected | |
| } | |
| else if (sender == _wpfConnection && message.TryGetValue("command", out object val) && val.ToString() == "StopEvents") | |
| { | |
| _wpfConnection.Dispose(); | |
| _wpfConnection = null; | |
| } | |
| else if (sender != _wpfConnection) // forward messages to WPF app | |
| { | |
| await _wpfConnection.SendMessageAsync(message); | |
| var response = new ValueSet | |
| { | |
| { "info", "forwarded message" } | |
| }; | |
| await args.Request.SendResponseAsync(response); | |
| } | |
| deferral.Complete(); | |
| } |
The UWP application initiates a connection to the app service with the OpenAsync method of the AppServiceConnection class and sends messages passing a ValueSet to the SendMessageAsync method.
This file contains hidden or bidirectional Unicode text that may be interpreted or compiled differently than what appears below. To review, open the file in an editor that reveals hidden Unicode characters.
Learn more about bidirectional Unicode characters
| private async void OnAppService(object sender, Windows.UI.Xaml.RoutedEventArgs e) | |
| { | |
| // don't dispose the connection now! This closes the app! | |
| if (_appServiceConnection == null) | |
| { | |
| _appServiceConnection = new AppServiceConnection | |
| { | |
| AppServiceName = "com.cninnovation.desktopbridgesample", | |
| PackageFamilyName = "6d982834-6814-4d82-b331-8644a7f54418_2dq4k2rrbc0fy" | |
| }; | |
| AppServiceConnectionStatus status = await _appServiceConnection.OpenAsync(); | |
| if (status != AppServiceConnectionStatus.Success) | |
| { | |
| throw new InvalidOperationException($"App service connection failed with status {status.ToString()}"); | |
| } | |
| } | |
| var valueSet = new ValueSet | |
| { | |
| { "command", "data" }, | |
| { "data", textData.Text } | |
| }; | |
| AppServiceResponse response = await _appServiceConnection.SendMessageAsync(valueSet); | |
| if (response.Status == AppServiceResponseStatus.Success) | |
| { | |
| string answer = string.Join(", ", response.Message.Values.Cast<string>().ToArray()); | |
| await new MessageDialog($"received {answer}").ShowAsync(); | |
| } | |
| else | |
| { | |
| await new MessageDialog("error send").ShowAsync(); | |
| } | |
| } |
Similar to dealing with the app service in the UWP application, it’s done in the WPF application. The connection to the app service is opened with the OpenAsync method of the AppServiceConnection class. After the first message is sent to start receiving events, the main functionality is in the event handler for the event RequestReceived. Here, an event is fired in the service class. The view-model subscribes to the event to add the information to an ObservableCollection and in turn display the message in the user interface.
This file contains hidden or bidirectional Unicode text that may be interpreted or compiled differently than what appears below. To review, open the file in an editor that reveals hidden Unicode characters.
Learn more about bidirectional Unicode characters
| using BooksLib.Services; | |
| using System; | |
| using System.Linq; | |
| using System.Threading.Tasks; | |
| using Windows.ApplicationModel.AppService; | |
| using Windows.Foundation.Collections; | |
| namespace DesktopBridgeSample.Services | |
| { | |
| public class AppServiceClientService : IAppServiceClientService, IDisposable | |
| { | |
| private readonly IDialogService _dialogService; | |
| private AppServiceConnection _connection; | |
| public event EventHandler<string> MessageReceived; | |
| public AppServiceClientService(IDialogService dialogService) | |
| { | |
| _dialogService = dialogService; | |
| } | |
| public void Dispose() | |
| { | |
| _connection?.Dispose(); | |
| } | |
| public async Task SendMessageAsync(string message) | |
| { | |
| try | |
| { | |
| if (_connection == null) | |
| { | |
| _connection = new AppServiceConnection | |
| { | |
| AppServiceName = "com.cninnovation.desktopbridgesample", | |
| PackageFamilyName = "6d982834-6814-4d82-b331-8644a7f54418_2dq4k2rrbc0fy" | |
| }; | |
| AppServiceConnectionStatus status = await _connection.OpenAsync(); | |
| _connection.RequestReceived += Connection_RequestReceived; | |
| if (status == AppServiceConnectionStatus.Success) | |
| { | |
| var valueSet = new ValueSet(); | |
| valueSet.Add("command", message); | |
| AppServiceResponse response = await _connection.SendMessageAsync(valueSet); | |
| if (response.Status == AppServiceResponseStatus.Success) | |
| { | |
| string answer = string.Join(", ", response.Message.Values.Cast<string>().ToArray()); | |
| MessageReceived?.Invoke(this, $"received {answer}"); | |
| } | |
| else | |
| { | |
| MessageReceived?.Invoke(this, $"error sending message { response.Status.ToString()}"); | |
| } | |
| } | |
| else | |
| { | |
| await _dialogService.ShowMessageAsync(status.ToString()); | |
| } | |
| } | |
| } | |
| catch (Exception ex) | |
| { | |
| await _dialogService.ShowMessageAsync(ex.Message); | |
| } | |
| } | |
| private void Connection_RequestReceived(AppServiceConnection sender, AppServiceRequestReceivedEventArgs args) | |
| { | |
| string received = $"received from UWP: {string.Join(", ", args.Request.Message.Values.Cast<string>().ToArray())}"; | |
| MessageReceived?.Invoke(this, received); | |
| } | |
| } | |
| } |
Issues
Adding references to the metadata files of the Windows Runtime could be made easier. Other than searching the files in the directory structure, you also need to pay attention on absolute or relative links in the project file. You might need to change this manually. Visual Studio by default add a relative link – which no longer works with links outside of the project structure when you move the project to a different directory.
Using communication across app services is probably not what you wish for. However, it’s not a hard task to enhance communication with ValueSet by adding a custom abstraction layer.
Summary
It’s still the best way to create new desktop applications using the Universal Windows Platform. However, the desktop bridge offers an easy way to enhance existing WPF applications for Windows 10 users. Some of the Windows Runtime APIs can directly be used from WPF as soon as the WPF application is offered as a packaged app. All features from UWP apps can be used by launching a UWP application from WPF, and communicating with this application using app services.
What’s a little bit messy is referencing the metadata files needed to invoke the Windows Runtime APIs form WPF, and also the communication via app services. Probably you would also prefer to use UWP controls directly within WPF user interfaces instead of the need to create a second window. Having extra windows can be too difficult for some users. The next article in this series describes how UWP controls can be directly used from within WPF applications – using XAML Islands.
In case you would like to enhance your WPF applications now – go ahead and use Windows Runtime APIs with the help of the desktop bridge.
If this information motivated you enhancing your WPF applications with UWP features, consider buying me a coffee which helps me staying up longer and writing more articles.

More information on XAML and writing UWP applications is in my book Professional C# 7 and .NET Core 2.0, and in my Programming Windows Apps workshops.
Enjoy learning and programming!
Christian
Links
Desktop Applications with XAML. Part 1: UWP
Desktop Applications with XAML. Part2: Desktop Bridge
Desktop Applications with XAML. Part 3: XAML Islands
Package desktop applications (Desktop Bridge) on Microsoft Docs
Photo ID 70772385 Hiking on Kamchatka Peninsula © Alexander Piragis from Dreamstime

4 thoughts on “Desktop Applications with XAML. Part 2: Desktop Bridge”