
In part 1 of this article series I’ve shown how to configure the Azure IoT button and how to invoke an Azure Function when the button is clicked. In this article let’s continue and invoke a SignalR Service which in turn calls into a .NET Core client application.
Microsoft Azure offers great features for IoT devices. A simple device is the Azure IoT button. This button is – using a wireless network – connected to the Azure IoT hub. Clicking the button allows to trigger any Azure service. I’ve created an application to call back into a .NET Core client application. Using multiple buttons, this application gets the information about which button was clicked – which is described in this article.
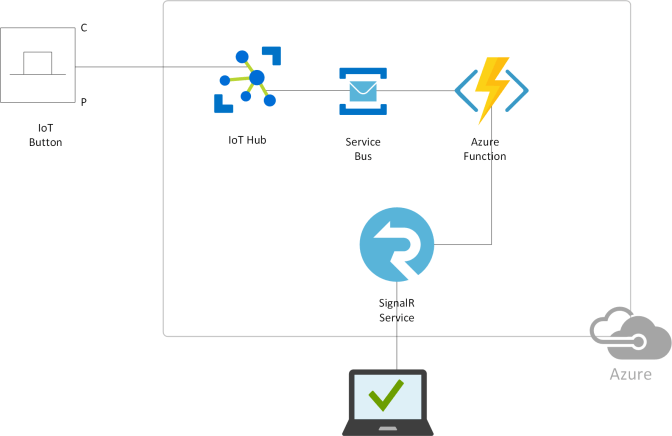
In this article I’m using the Azure IoT Hub, Events, the Service Bus, Azure Functions, Azure SignalR Services, and a .NET Core client application.

Here you can read the first part: Click the Azure IoT Button – Part 1
Solution
The button is connected to Microsoft Azure using the MQTT over HTTP. The Azure IoT Hub contains a twin device representing the button. As the button is clicked, data is sent to the Azure Service Bus. I’ve created an Azure Function app that is connected to the Service Bus. The Azure Function App has an outbound binding to an Azure SignalR Service. This in turn sends messages to all connected clients.
ASP.NET Core SignalR
After setting up the Azure button, the Azure IoT hub, let’s implement a SignalR Service that will be called from the Azure Function.
ASP.NET Core SignalR allows real-time communication from web apps to clients, it offers an API for server-to-client remote procedure calls. Behind the scenes, SignalR makes use of WebSockets, Server-Sent Events, or Long Polling.
Server-Sent Events is a HTML5 standard which is supported by some browsers to allow on are supported by some browsers which allow mobile devices to save battery live by not keeping a network connection opened (which is done with WebSockets). In a supported network, a proxy server can take over the connection for the mobile device, and send push notifications to the device using technologies such as OMA (Open Mobile Alliance). See the links at the end of this article for more information on Server-Sent Events.
Here, we’ll create an implementation of a simple ASP.NET Core SignalR Service that forwards button clicks to all connected client apps. With part 3 of this article series, Azure SignalR Services will be used instead.
The sample project ASPNETCoreSignalRService started with the project template ASP.NET Core Web Application using the empty project template with ASP.NET Core 2.1. SignalR is part of ASP.NET Core since version 2.1. For SignalR startup, all that needs to be done is to define the implementations for the interface contracts in the dependency injection container (AddSignalR) in the ConfigureServices method, and to define the middleware with the link to the hub (UseSignalR) in the Configure method:
public class Startup
{
  public void ConfigureServices(IServiceCollection services)
  {
    services.AddSignalR();
  }

  public void Configure(IApplicationBuilder app, IHostingEnvironment env)
  {
    if (env.IsDevelopment())
    {
      app.UseDeveloperExceptionPage();
    }

    app.UseSignalR(config =>
    {
      config.MapHub<IoTButtonHub>("/api/buttonhub");
    });

    app.Run(async (context) =>
    {
      await context.Response.WriteAsync("SignalR Sample");
    });
  }
}
The implementation of the hub is simple. The hub class IotButtonHub derives from the Hub class. With this you can override methods to get informed about clients connected and disconnected. In the sample code just the ButtonClicked method is defined. This method will be called from the Azure Function to send a message to all connected clients. This method can define a flexible number of parameters that will be passed from the caller. From the button JSON information is received that is directly passed to the parameter of the ButtonClicked method. Of course, you can also split the JSON information in its parts and define the parameters accordingly.
With the implementation of the ButtonClicked method, the Clients property of the base class is used. The Clients property returns an object implementing the interface IHubCallerClients. Using this interface, you can send messages to a client, a group of clients, or all clients. In the sample code, the Others property is used to send a message to all connected clients but not the caller. The Azure Function calling this method doesn’t need to be called back, just the connected .NET Core clients. The message created for the clients is the Waiter message, sending the received data along.
using Microsoft.AspNetCore.SignalR;
using System.Threading.Tasks;

namespace ASPNETCoreSignalRService.Hubs
{
    public class IoTButtonHub : Hub
    {
        public Task ButtonClicked(string data)
        {
            return base.Clients.Others.SendAsync("Waiter", data);
        }
    }
}
The ASP.NET Core SignalR Service application can be hosted with an Azure App Service.
.NET Core Clients
The .NET Core client application requires the NuGet package Microsoft.AspNetCore.SignalR.Client. To setup a connection, the HubConnectionBuilder from the namespace Microsoft.AspnetCore.SignalR.Client is used. The WithUrl method defines the link to the SignalR service. Testing this on the local machine using the Kestrel server, localhost is used. The link to the hub was defined earlier in the configuration of the middleware. Before starting the connection, a subscriber is registered using the On method. Here, we listen for Waiter messages that receive a single string (the JSON information from the button). As the final step for SignalR handling, the client starts the connection. Then it just needs to wait for messages to arrive.
var connection = new HubConnectionBuilder()
  .WithUrl("https://localhost:5001/api/buttonhub/")
  .Build();

Console.WriteLine("adding the handler");

connection.On("Waiter", (string s) =>
{
   Console.WriteLine($"Button clicked with message {Environment.NewLine}{s}");
});

await connection.StartAsync();
Console.WriteLine($"connection started, waiting for events with connection state {connection.State}");
Azure Function calling the SignalR Service
In part 1 of this article series, the Azure Function was just writing a message. Now it needs to be changed to call the SignalR Service. The connection to the service is similar to the .NET Core client. The function just doesn’t need to listen to events from the service, but instead invoke the ButtonClicked method from the hub. This is done by sending the ButtonClicked message sending the JSON string:
public class ClickToSignalRFunction
{
  private static HubConnection s_connection = null;

  static ClickToSignalRFunction()
  {
    var connection = new HubConnectionBuilder()
      .WithUrl("https://localhost:5001/api/buttonhub/")
      .Build();
    s_connection = connection;
  }

  private static HttpClient client = new HttpClient();

  [FunctionName("ClickToSignalRFunction")]
  public async Task Run(
    [IoTHubTrigger("messages/events", Connection = "IOTButtonConnectionString")] EventData message,
    ILogger log)
  {
    string json = Encoding.UTF8.GetString(message.Body.Array);
    log.LogInformation($"C# IoT Hub trigger function processed a message: {json}");
    if (s_connection.State != HubConnectionState.Connected)
    {
      await s_connection.StartAsync();
    }
    await s_connection.SendAsync("ButtonClicked", json);
  }
}
Take away
SignalR offers an easy way for callbacks to connected clients – an abstraction from Web Sockets but also offering other mechanisms without the need for any code changes. Integrating a custom SignalR service it’s an easy task to integrate telemetry information from an Azure IoT device triggering an Azure Function and in turn call into a SignalR service to get the information to all connected client applications that can run locally.
In the next part of this article series, the ASP.NET Core SignalR service is changed to use a consumption based Azure SignalR Service with output binding from the Azure Function.
Enjoy learning and programming!
Christian
If you’ve read this far, consider buying me a coffee which helps me staying up longer and writing more articles.

Interesting Links:
Click the Azure IoT Button – Part 1
Bonus Chapter 3 – SignalR and WebHooks
More information on C# and programming .NET Core applications is in my book Professional C# 7 and .NET Core 2.0, and in my workshops.
Button Image ID 8349636 © Valeriya Potapova | Dreamstime.com

2 thoughts on “Click the Azure IoT Button – Part 2”